
Chapter Eight
Leverage
There is nothing magical about a dent tool. It is a lever. Human beings understood levers long before automobiles existed, and most of what a technician calls feel can be traced to a few mechanical facts. You do not need to calculate equations while kneeling beside a door. You do need to know what changes when you move your hand, your fulcrum, or your tip. This chapter names the parts, names the kind of lever we actually use, names the fulcrums you have been choosing without naming them, and then turns to the thing on the other end of the rod: a panel that is also a spring, and whose behaviour under your tip has been measured and named by people who were not thinking about us at all.
8.1The parts of the system
Every lever has a fulcrum, an effort, and a load. The fulcrum is the pivot. It may be a brace, a window channel, a wedge, an opening, or even part of your own hand. The effort is the force you apply. The load is the panel at the tool tip. Your control hand performs another job entirely: it stabilises the geometry and tells you where the tip is. This is why two hands matter. One hand governs position. The other governs force. Beginners frequently mix those jobs. They push and search at the same time, and the result is a tool tip wandering across the panel while force is already being applied. Find first. Push second.
- The fulcrumthe pivot
- The point the tool turns about. It may be a brace, a window channel, a wedge, an opening, or part of your own hand. A fulcrum that moves is not a fulcrum. It converts controlled effort into uncontrolled motion, usually with your weight behind it.
- The effortyour pushing hand
- The force you apply, and the distance from the fulcrum at which you apply it. Both halves count. Sliding your hand along the bar costs you nothing in effort and buys or spends leverage with every inch.
- The loadthe panel at the tip
- Not the dent: the panel. The dent is a shape. The load is a stiffness, and it has more in common with a spring than with a lump of clay.
- The control handthe fourth part
- It performs a different job from the other three. It stabilises the geometry and reports where the tip is. One hand governs position. The other governs force. Beginners mix the two jobs, and the tool wanders across the panel while force is already being applied.
One hand governs position. The other governs force. Find first. Push second.
8.2The lever we actually use
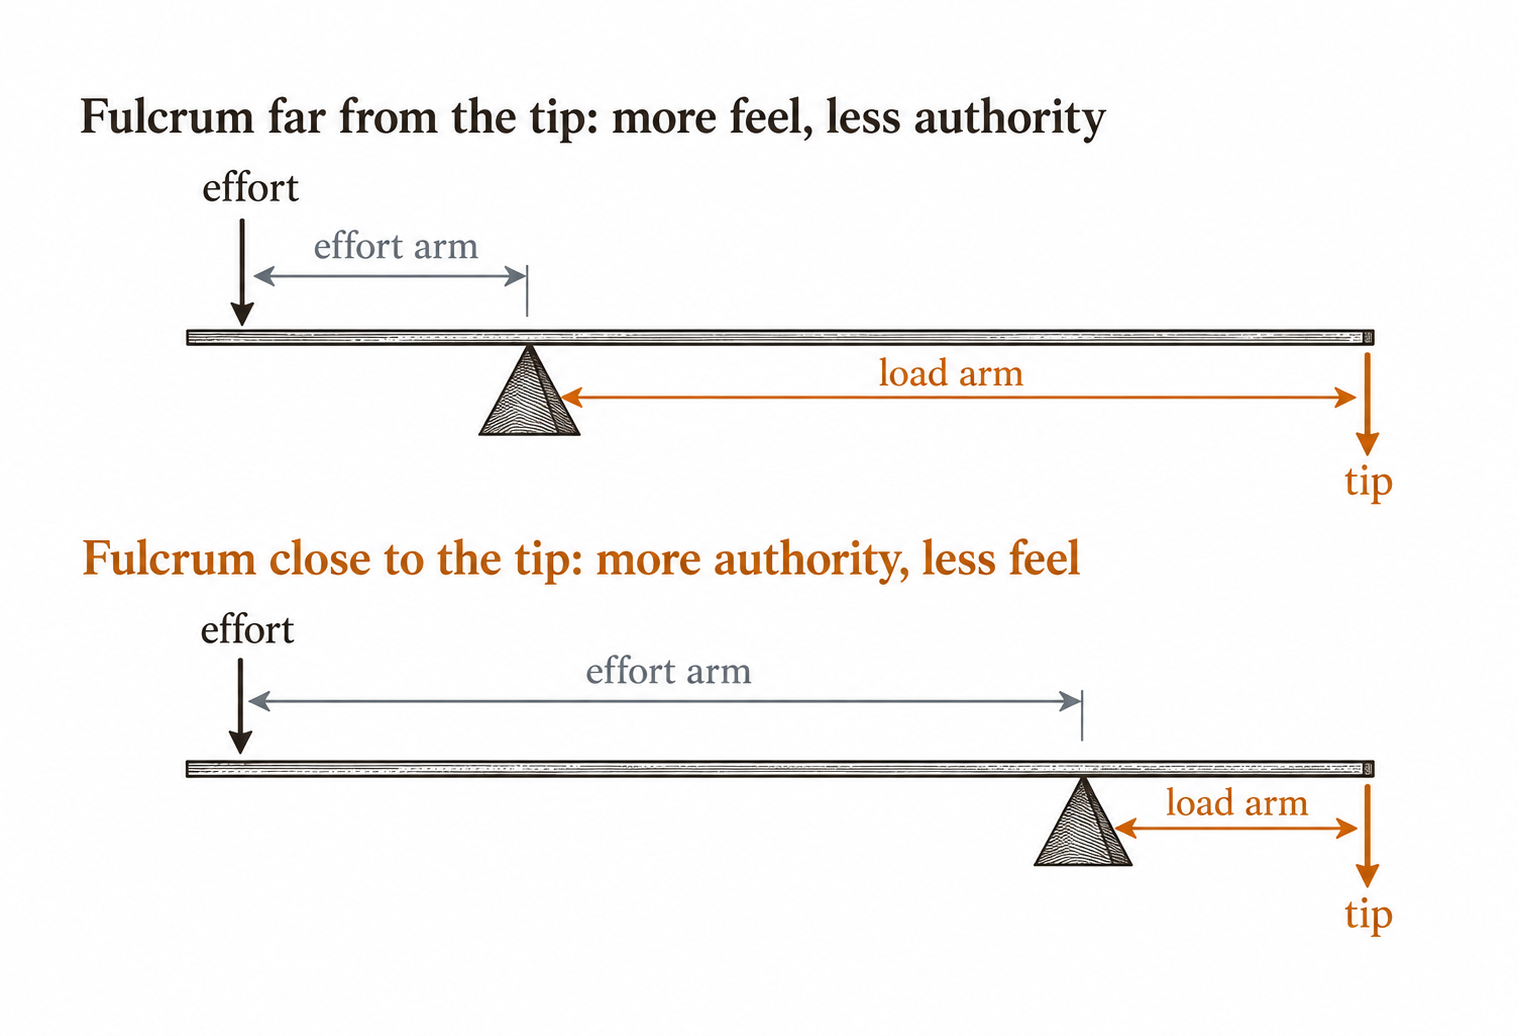
Many paintless dent repair arrangements behave like third class levers, where effort lies between the fulcrum and the load. Third class levers sacrifice force in exchange for motion and sensitivity, and that trade is useful to us: a small hand movement can produce useful motion at the tip, while resistance from the panel can be felt through the tool. But there is a cost. Geometry becomes unforgiving. The distance from fulcrum to your effort, and the distance from fulcrum to the tip, determine how much effective force reaches the panel. Move the fulcrum closer to the dent and you shorten the load arm: more authority reaches the tip, but feel may decrease. Move your effort farther from the fulcrum and you increase leverage. That is why one inch can transform a repair, and why a young technician will sometimes spend ten minutes changing tools when he should have spent ten seconds changing the fulcrum. Good leverage with the wrong tool often beats poor leverage with the right tool.
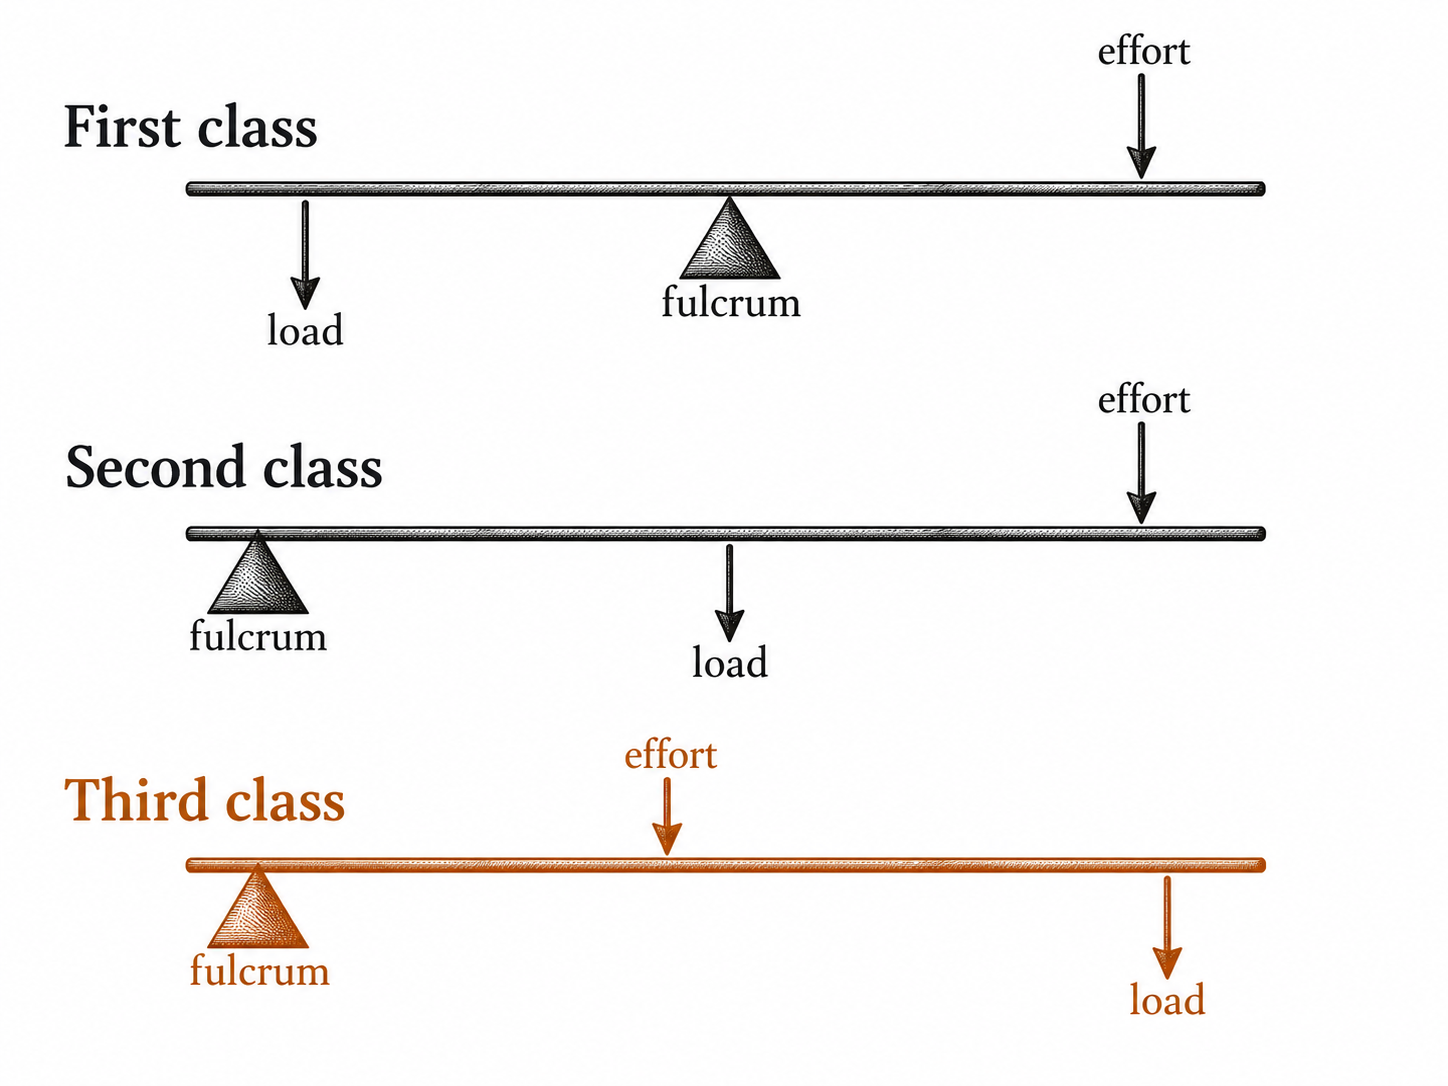
8.3The fulcrums you have been choosing
Now the part of the system nobody catalogues. We argue endlessly about tools and almost never about pivots, and yet the pivot decides more of the outcome than the rod does. Here are the fulcrums this trade actually uses. The tag beside each is its stability: how much of your effort it returns as motion at the tip rather than as motion of itself.
- A structural bracehighest stability
- An inner reinforcement, a hat section, a bracket. It does not move because it was designed not to move. Where one is within reach it is almost always the right answer.
- A window channel or trackhigh
- Stiff, straight, and conveniently placed on a door. Watch the felt and the glass: what you gain in stability you can lose in damage you did not intend.
- An aperture edgemoderate
- The flanged lip of a door opening, a light aperture, a tailgate. Strong in one direction and weak in another, so the direction of your push matters more here than anywhere.
- A wedge or a spacermoderate, and yours to control
- Introduced deliberately, which is the advantage: you put it where the geometry wants it, not where the car happens to offer one. It is only as good as the surface it bears on.
- A dedicated fulcrum or bridgemoderate to high
- A tool made to be a pivot. It buys you a pivot exactly where you want it, and it costs you setup time. That trade is nearly always worth making.
- Your own hand or forearmlowest, and most informative
- Soft, and therefore unstable. It also has nerve endings. A hand fulcrum is a poor pivot and an excellent instrument, which is why experienced technicians use one late in a repair and almost never early.
8.4The rod is a spring
The next thing to understand is that the tool itself is not rigid. Long tools flex more than short tools, and small changes in diameter produce dramatic changes in stiffness, which is why the longest tool that reaches is often not the best tool. You usually want the shortest tool that reaches and the thickest tool that still fits the access. That principle alone will save you a great deal of frustration. When a rod flexes it stores energy, so you feel as though you are pushing when part of what you are doing is bending the tool. If the panel has not yet moved past its yield point, you may simply be loading a spring. Then the metal gives, the stored energy releases, and the low becomes a high so quickly that the young technician wonders what happened. What happened is that the system finally paid out what you had been putting into it. And the rod is only half the arrangement. The panel is a spring too, with its own stiffness and its own rule for how much it gives back,1 so the jump you feel is two springs letting go together, not one.
8.5The panel is a spring too
Turn now to the far end of the rod. We say a panel resists. The word is vague, and the vagueness has cost this trade a vocabulary. A panel under a load does something specific and repeatable, and the manufacturers have been measuring it for decades: not to help us repair a door, but to decide whether the door would dent in the first place. Their test pushes an indentor into a panel and records force against displacement.2 The curve has four regions, and each one has a name.
8.5.1The four regions
- A. Initial stiffnessthe first resistance
- The slope of the curve before anything gives.2 Purely elastic. Push and release here and the panel returns exactly as it was. Everything you do in this region is free, and nothing you do in it is progress.
- B. The oil can loadthe pop
- The buckling load. The panel snaps through and you feel it let go.2 Every technician knows this event and most have no name for it. It is not the metal yielding. It is the shape changing its mind about which way to be curved.
- C. Secondary stiffnessstill elastic
- After oil canning the panel goes on deflecting elastically.2 This is the region that deceives you: it feels like progress, and it is still a loan. Release here and the panel takes it all back.
- D. Plastic deformationthe only region that pays
- The onset of permanent deformation in the material.2 This is the only part of your push you get to keep. Everything before it was rent.

Then comes the sentence in that literature which is really about us. When the load is reversed, the lower part of the curve does not return to zero.2 That gap is the dent. A stone, a door edge, a hailstone: each one took a panel up the same four regions and let go, and the distance the curve failed to come back is the damage you were called out to look at. Now read it the other way. Your rod runs the same curve in the opposite direction, and the gap you fail to close is the low your customer will find in the car park. Repair is denting, performed carefully and in reverse.
8.5.2The energy of a dent
One more number from that same literature, and it is the most useful number in this chapter. Empirical work gives the energy required to start a dent as W = K·YS²·t⁴/S: yield strength squared, panel thickness to the fourth power, divided by the stiffness of the panel.3 Read the exponents. Thickness to the fourth. A panel one fifth thicker takes about twice the energy to dent, and about twice the work to move. Strength enters squared, so the metals in chapter one are not a modest adjustment: they are the dominant term after thickness. The same standards body that sets the target puts a perceptible in-service dent at around ten joules of input.3 Ten joules. That is the whole event you have been quoting by its width.
8.6The tip decides the event
Force also depends on contact area, because the panel does not experience force in the abstract. It experiences pressure. Put the same effort through a sharp tip and a broad tip and you have created two very different events. A sharp tip concentrates stress and can move a precise point past yield quickly, which is excellent when precision is required and terrible when broad movement is required. A wide tip spreads stress across a larger area and can move bulk metal gently without creating a sharp local high. This is why broad damage wants broad tools. Use the largest surface practical for the stage of work you are in, and as the repair becomes finer, let the contact surface become finer with it. Leverage changes by phase in the same way. Early bulk work wants authority. Finishing wants information. If you use a high force geometry for the entire repair you will eventually become too powerful for the work. If you use a delicate finishing geometry throughout you will exhaust yourself moving bulk metal. Match the setup to the task.

8.7When the panel refuses you
So when a panel refuses you, stop blaming the tool and ask four questions in order. Change the geometry before you merely add force.
- Is the fulcrum stable?first, always
- A pivot that shifts is spending your effort on itself. Set the pivot before you do anything else.
- Is the load arm too long?second
- Move the fulcrum toward the tip and authority rises while feel falls. One inch can settle an argument you have been having for ten minutes.
- Is the tool storing your effort?third
- A long or thin rod is a spring holding your push in reserve. Shorten it or thicken it and the same hand delivers more.
- Is the metal locked?fourth
- Surrounding tension, a body line, a brace behind the low. No amount of force answers this one: only release does, and that is chapter five.
None of this tells you where to push. What it tells you is why pushing works, and that turns out to settle most of the arguments a technician has with himself. The tool is a lever whose two hands do two different jobs. Most of our arrangements sacrifice force deliberately, to buy feel. Between them, the fulcrum and the two distances around it decide what actually reaches the metal. Your rod holds some of the rest in reserve, being a spring. Last, the tip decides whether what arrives does so as a point or as an area. When it refuses you, then, the honest first question is not how hard you pushed. It is where the force went: into the metal, into the tool, or into the return you had already been promised. Preparation is not what happens before the work. Preparation is part of the work.
Notes
- The panel's elastic return is governed by its yield strength over its elastic modulus and falls with increasing thickness; see chapter seven and R. H. Wagoner, J. F. Wang and M. Li, “Springback,” in ASM Handbook, vol. 14B, Metalworking: Sheet Forming (ASM International, 2006), 733–755. ↩
- “Initial stiffness is given by the slope of the curve in the first region, until the buckling load is reached. After ‘oil canning’, the panel continues to deflect elasticity [sic], before the onset of plastic deformation in the material. When the load is reversed, permanent deformation of the panel is indicated by the fact that the lower portion of the curve does not return to zero.” Geoff Davies, Materials for Automobile Bodies, 2nd ed. (Oxford: Butterworth-Heinemann), 43 and fig. 2.21. ↩
- “Empirical formulae predicting the force and energy required to initiate a dent have been presented in recent years. Typically: W = (K.YS².t⁴)/S … where W is the denting energy, K is a constant, YS is the material yield strength, t is the panel thickness and S is the panel stiffness.” On the target: “Standards widely known include those published by the American Iron and Steel Institute, which defines a minimum dent resistance of 9.7 J.” On the field figure: “if the energy input to cause a perceptible dent in-service is 10 J then the dent testing procedure should reflect this.” Davies, Materials for Automobile Bodies, 43–44. ↩