
Chapter Six
Patterns
The last chapter argued that a best route exists. This one is the catalogue of routes. Every technician already works in patterns, whether or not he could draw the one he just used, and the difference between a man who knows his pattern and a man who does not is the difference between a method and a habit. A pattern is not a decoration. It is the order in which you spend your contacts, and since the previous chapter established that contacts are the currency, the order you spend them in is most of what separates an efficient repair from a lucky one. What follows is twenty of them, named, with what each is for and what each costs. None of them is a law. All of them are better than pushing wherever the eye happens to land.
A pattern is not a decoration. It is the order in which you spend your contacts.
6.1Every dent is unique, and patterns still work
Start by conceding the obvious objection, because it is true and it changes nothing. No dent you will ever meet is a perfect circle. Even hail is not: one side is deeper than the other, one edge drops off more sharply, and no two stones are the same size or arrive at the same angle, because they were pushed by wind and met a panel that was curved to begin with. Every dent is unique. So is every face, and portrait painters still learn where the eyes sit.
A pattern is not a claim that your damage is symmetrical. It is a way of placing contacts so that each one is decided rather than discovered, and so that you can tell afterwards which of your pushes solved the dent and which solved your last push. On the most basic level there are two families to think in, circles and lines, and almost everything else is a variety of one of those. The circle family is the dish: a point arrived, the metal went down, and a crown formed around it. The line family is the crease: something travelled, and the damage has a path with a length.
6.2Why a dent cannot simply be unbent
Before the catalogue, the reason there has to be one. A sheet can be rolled into a tube and flattened again without stretching anything, because a cylinder and a plane are the same surface bent two ways. A dish is not like that. Gauss proved in 1827 that one particular measure of a surface's curvature cannot be changed by bending alone: it survives any deformation that does not stretch the material, which is why the result is called the remarkable theorem.8 A flat panel has that measure equal to zero everywhere. A dish does not, so no amount of bending will return it to flat. Metal has to move within the surface, radially, and that is what makes a dent a repair rather than a rearrangement.
Read the consequence, because it is the whole argument for working from the inside out. If the metal must travel radially for the centre to rise, then anything you do to the rim first stands in the path of that travel. Lift the rim and you close the route home. Outside-in is not merely inefficient. It is a geometric contradiction: you are demanding radial flow while removing the room for it. Every numbered pattern below except one obeys the same instruction, and the one that does not is listed so you can catch yourself doing it.
6.3The circle family
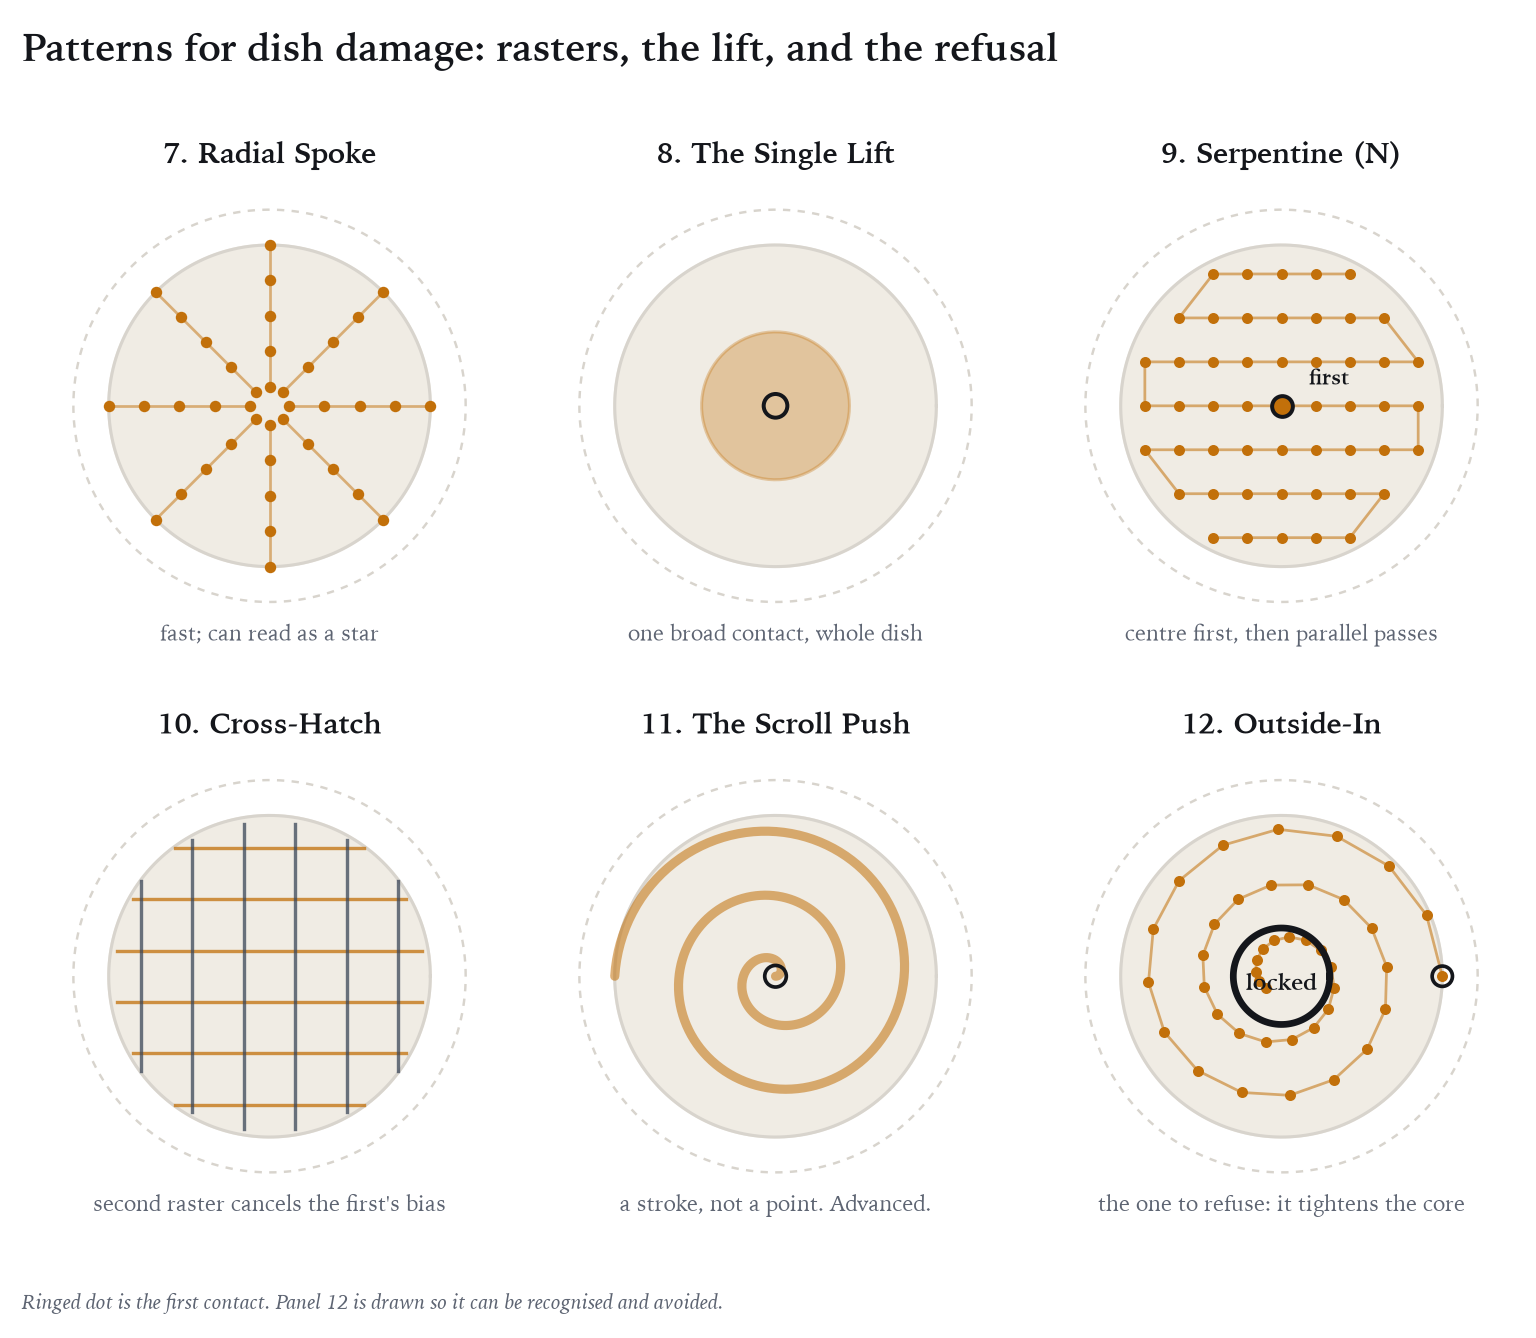
Twelve patterns for dish damage, from the one every technician invents by himself to the ones that have to be taught. The figure beside each family shows the placement, not the pressure: where your tip goes, in what order.
6.3.1How to choose a spiral, and why it is not taste
Three spirals appear below and technicians pick between them by feel. They do not have to. Step round any spiral in equal angles and count how many contacts land inside a given radius, and the three curves separate cleanly. The logarithmic puts a number inside radius R that grows only as the logarithm of R, so contacts per unit area fall as 1/R². The Archimedean grows in proportion to R, so density falls as 1/R. The Fermat grows as R², so density is flat: the same number of contacts on every square inch.1
Now set that against the damage. An impact dish is deepest at the origin and shallows to nothing at the rim, so the work to be done is concentrated in the middle, and the right curve is the one whose contacts are concentrated the same way. A deep, steep dish wants the logarithmic. A broad pan with a flat floor wants the Fermat, because there is nothing in the middle deserving extra attention. Most ordinary hail sits between the two and wants the Archimedean. Match the density of your work to the density of the problem is not a proverb. It is an instruction with an exponent in it.

- 1. The Islandbuild a centre, then leave it
- Raise a small area at the origin first and let it stand proud, then work outward from it in turns. The island gives every later contact something to be measured against, and it does something mechanical as well: a raised cap carries load by stretching its own middle surface rather than by bending, and a shell that works in tension is far stiffer than a flat plate of the same metal.4 The centre you raised first now resists being pushed back down while you work around it. It is the easiest pattern to teach and the easiest to overdo: an island raised too far becomes a high you will spend the rest of the repair taking back down.
- 2. The Logarithmic Spiralr = a·e^(bθ)
- Contacts crowd hard at the centre and open out as they travel, because the radius multiplies rather than adds with every turn. Step round it at a constant angle and the number of contacts inside a radius grows only as the logarithm of that radius, so their density per unit area falls as 1/R².1 That is the steepest concentration any of these curves gives you, and it is the right one for a deep dish whose depth falls away sharply from the origin.
- 3. The Archimedean Spiralr = a + bθ
- Each turn sits a constant distance outside the last, which is why it is usually described as the even spiral. It is even along the curve, and it is not even across the panel: the count inside a radius grows in proportion to that radius, so the density per unit area falls as 1/R.1 A gentler concentration than the logarithmic, and the middle setting of the three.
- 4. The Fermat Spiralr = a·√θ
- The one people describe backwards, including me until I did the arithmetic. Because the radius goes as the square root, the count inside a radius grows as R², and the contacts land at a constant number per unit of area.1 This is the only genuinely uniform spiral of the three, and it is the right one for a broad pan with a flat bottom, where there is no reason to pile work in the middle.
- 5. The Sunflowerthe golden angle, 137.5°
- This is the honest answer to the spider web, and it is the Fermat spiral again, stepped round by a particular angle. Place each contact 137.5 degrees on from the last at a radius growing as √n and you have the arrangement a sunflower head uses.2 The angle is not arbitrary. It is the golden angle, and the golden ratio is the hardest number in mathematics to approximate with a fraction,3 which is exactly what you want here: a contact only lines up with an earlier one when the angle between them is close to a simple fraction of a turn. Choose the worst-approximated angle there is and no two contacts ever fall on the same radial line. You cannot build a ridge by unknowingly working the same spoke. It is the most evenly distributed pattern available and the one to reach for on a dish that has already been chewed.
- 6. The Concentric Ringrings, inside out
- Complete a ring, then step out and complete the next. Simple to hold in the head and simple to teach. Its cost is its own geometry: rings can leave ring-shaped boundaries, visible under a board as a series of faint terraces.
- 7. The Radial Spokeout along the radii
- Push from the centre outward along one radius, return, rotate, repeat. Fast on shallow dish, and it has a characteristic failure with a name borrowed from the press shop. Rolled sheet is not the same in every direction, and a die that ignores this produces ears: a drawn cup comes out with a scalloped rim in four or six places rather than a round one.5 Spokes do the same thing by hand. Work eight radii hard and you have imposed an eight-fold symmetry on the panel, and the light will read it as a star rather than a circle.
- 8. The Single Liftone broad contact, the whole dish
- Where the access and the tool allow it, put a large tip under the middle and bring the whole low up in one movement. Nothing is cheaper in contacts. It does not finish anything: the crown is still there and the shape is still rough, and the pattern's job was only to stop the dent being one big problem.
- 9. The Serpentine, or N Patternparallel passes, alternating direction
- Run the tip up, across, and back down, as your hand naturally wants to. Then lay a second set of passes over the first at a right angle. Your first contact still belongs in the dead centre. The layering is the whole point: a single raster carries a direction, and a second raster across it cancels the bias the first one built in.
- 10. The Cross-Hatchtwo rasters, ninety degrees apart
- The N pattern taken deliberately rather than by instinct, and drawn here because most technicians do half of it and stop. The reason for the second pass is the same anisotropy that makes a drawn cup grow ears: the sheet already has a preferred direction from the mill, and a raster run only one way adds a second preferred direction on top of it.5 Crossing the raster averages the direction you imposed against the direction the steel arrived with. If you only ever push in one direction you are not raising a dish, you are combing it.
- 11. The Scroll Pushpush and drag together
- Advanced, and not for a young technician. With good leverage and a hand push, the tip is dragged slightly as it lifts, so the contact is a short stroke rather than a point. It moves a great deal of metal smoothly and it is unforgiving: the same drag that blends a broad low will write a line across a panel if the pressure is wrong.
- 12. The Outside-Inthe one to refuse
- Named so that you can recognise yourself doing it. Start at the rim and work toward the middle and you tighten the metal around the core before you have lifted it. The centre, already the deepest part, is now also the most locked. Every pattern above shares one instruction, and this is it stated backwards: work from the inside out.

If you only ever push in one direction you are not raising a dish. You are combing it.
6.4The tip decides how much you must open
One rule cuts across all twelve, and it belongs here rather than in a chapter about tools. The sharper the tip, the more the dent has to be opened before you use it. The reason is in the contact itself. For a rounded tip pressed against a panel, the contact patch grows as the cube root of both the force and the tip radius, so the average pressure under the tip rises as the tip radius falls, in proportion to one over its two-thirds power.9 Halve the radius of the tip and the same hand pressure delivers about sixty per cent more pressure to the metal. That is exactly what you want for a small tight high and exactly what marks a finish or locks a core when the metal around it has not been released first. So the order runs: open, then concentrate. A technician who reaches for his sharpest tip early is asking a point contact to do a job that needed room made for it, and the panel will tell him so under the board about twenty minutes later.
6.5The line family
Creases are not dishes and they do not answer to dish patterns. A crease is a path. It has a length, a bottom, two banks, an entry and an exit, and it will mislead you faster than any other damage on a car.
6.5.1Read it from four sides first
Read a crease from all four directions before you touch it: from each end along its length, and from both sides across it. A crease read from one end looks shallower than it is, because you are sighting down the trench. Read from the side it shows you its depth and hides its path. Neither view alone is the damage. This is the one form where a single viewpoint is not merely incomplete, it is actively deceptive.
- 13. The Trench Runone line, on the bottom
- Run the tip along the very bottom of the crease, a single continuous line, and tap down the errors afterwards. The plainest crease pattern and the one to learn first. If your tool keeps slipping off the bottom from behind, the tip is too sharp for the trench and you should be dropping the edges before you go back in.
- 14. The Ten Percent Passa tenth at a time, ten times
- Less a path than a discipline, and the most valuable line in this chapter. Take about a tenth of the depth on each pass and make about ten passes down the whole length. This is not merely caution, and industry has a name for the principle: incremental sheet forming, where a small tool walks a panel into shape in many light passes instead of one press stroke, reaches shapes that cannot be stamped in a single hit at all, because the deformation stays local and the strain is broken into steps the metal can absorb.7 Ten light passes are not a slower way of doing one heavy one. They are a different process with a higher ceiling.
- 15. The Lacing, or Football Hasha W across the trench
- Push across the trench in a zigzag, working both banks as you travel, the way a football is laced. It moves a crease quickly and it is the most dangerous pattern in this chapter, and the danger can be written down. The strain at the surface of a bend is the sheet thickness over twice the bend radius, so the tightest part of the trench is already the most strained metal on the panel, and the paint on it is the most strained part of that.6 Every stroke that crosses the bottom adds curvature exactly where the radius is already smallest. Use it on a broad soft crease. Keep it off a sharp one.
- 16. The Ladderrungs across, before the run
- Short passes across the crease at intervals, opening the banks before you ever run the bottom. It buys the trench room to rise. The ladder is what you use when the trench run alone is not moving, and it is very often the answer that was missing.
- 17. The Chevronangled passes, alternating banks
- Passes set at an angle to the path, alternating side to side, each one working one bank down toward the trench. Gentler than lacing because no stroke crosses the bottom at ninety degrees.
- 18. The Walk-Backstop short of the end, on purpose
- The rule that saves creases. Never run a crease all the way to its end and close it up. Bring it up along the length and stop short, leaving the last portion open. If you drive a deep crease perfectly to the surface and carry it right into the corner, that final fraction can no longer be reached: you have pushed the damage into a place with nowhere to go, and getting it out will cost you the paint. Release it, open it back up, and come at it again.

You cannot finish a crease by finishing one end of it. You have to leave it somewhere to go.
6.5.2Why the closed end will not come back
That rule cost me panels before I understood it, so here is what is actually happening at the end of a crease. When a thin sheet is pushed at a point it does not curve smoothly. It throws the deformation into a cone with a sharp core, and when a crease runs out, the energy that was spread along its length collects at the tip.10 Work out the scaling and the sheet turns out to be doing something deliberate: elastic energy in a crumpled sheet condenses into narrow ridges and into the points where ridges end, leaving most of the material almost unstrained and a very small region carrying nearly everything.11
So the tip of a crease is not simply the last bit of the damage. It is a stress focus, and it is where the metal is most worked and the paint is nearest its limit. Drive the trench up to the surface along its whole length and carry it into that corner, and you have pushed the remaining strain into the one place with nowhere left to send it. You have not finished the crease. You have concentrated it. Which is why the cure is to open the end back up, spread the focus along the length again, and come back at it: not more force at the tip, but less of the crease ending there.
6.6Where the two families meet
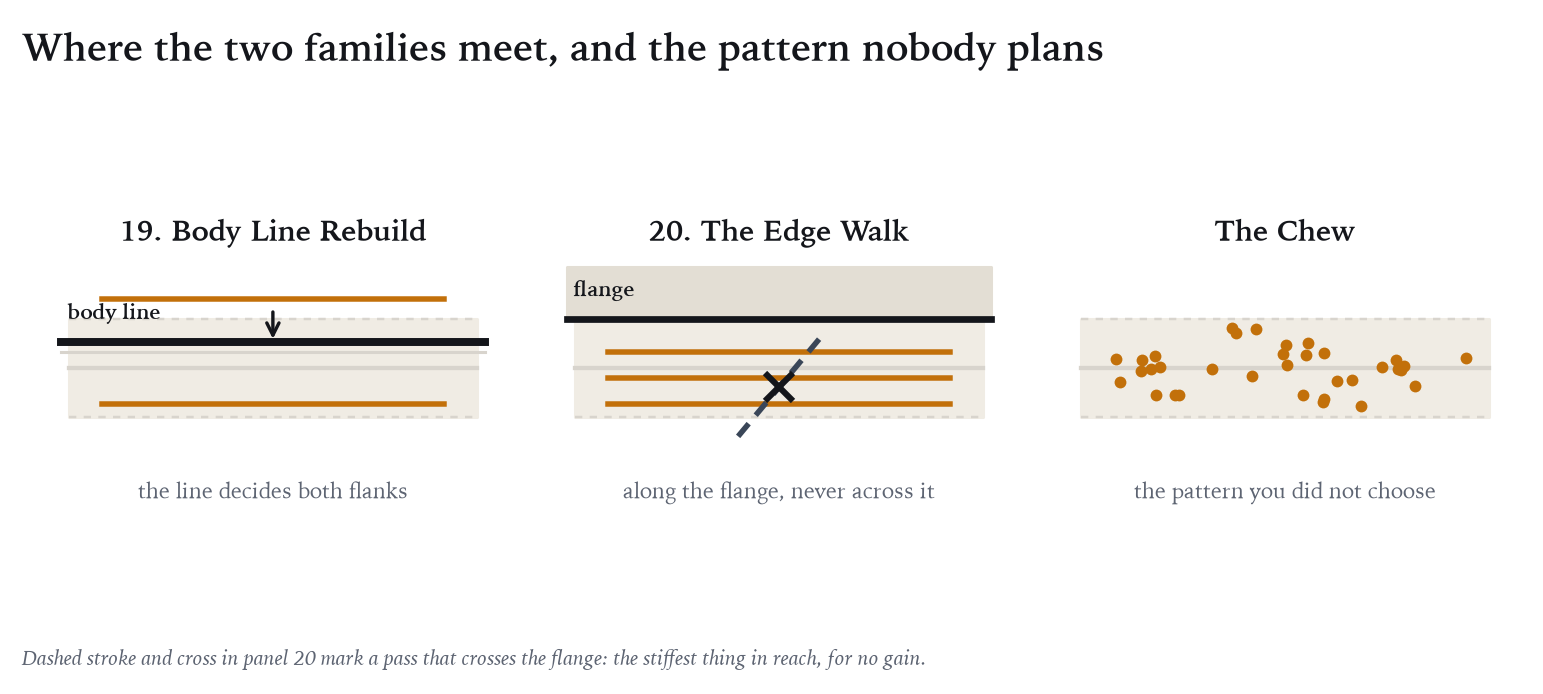
- 19. The Body Line Rebuildthe line governs everything near it
- A crease that runs along or across a factory body line is not a crease with a complication, it is a different problem. The line is a stiffener: it decides the shape of the metal on both sides of it. Sometimes it has to be rebuilt early because everything around it will be measured against it. Sometimes raising it first locks the damage on both flanks. The panel outranks the rule, and this is where that matters most.
- 20. The Edge Walkalong a flange, never across it
- Damage on or beside a flanged edge, worked in passes running parallel to the edge. A flange is very strong in one direction and weak in another, so a pattern that crosses it is fighting the stiffest thing in reach for no gain.
- The Chewthe pattern you did not choose
- Push somewhere low, tap somewhere high, push again, tap again, until the panel looks flat. It is not on the numbered list because it is not a plan, and it is here because it is what most of us do when we stop thinking. It often works. Its cost is that you never learn which of your contacts repaired the dent and which repaired your previous contact. Efficiency begins when you can tell the two apart.
6.7Choosing one
So how do you pick? Four questions, and they take about five seconds once they are habit. Where is the depth concentrated: in the middle, evenly, or out at the rim? That chooses among the spirals. How much room does the metal have to move: is the damage open, or is it tight against a brace or a line? That decides whether you open with a ladder or a single lift before any pattern at all. How sharp is the tip you intend to finish with, and therefore how much must be opened first? And has this panel been worked before, by you or by somebody else? If it has, reach for the sunflower, because a panel that has already been chewed needs contacts that will not line up with anybody's old ones.
And expect to leave the pattern. These are openings, not scripts. A real repair usually starts inside one pattern, meets something the pattern did not anticipate, and finishes inside another. That is not a failure of the pattern. That is what the pattern was for: it got you far enough in to see what you were actually dealing with, and it left a record you can read afterwards. The technician who cannot name the pattern he abandoned has nothing to think about tonight. The one who can is holding the only kind of evidence this trade produces.
Notes
- For contacts placed at equal angular steps, the count inside radius R follows from inverting the spiral. Logarithmic, r = ae^(bθ): θ ∝ ln(R/a), so n ∝ ln R and the areal density n/πR² falls as 1/R². Archimedean, r = a + bθ: θ ∝ R, so n ∝ R and density falls as 1/R. Fermat, r = a√θ: θ ∝ R², so n ∝ R² and density is constant. The last of these is why the Fermat spiral is the curve underlying the sunflower arrangement in the next entry. Derivation is the author's; the spirals are standard. See Eric W. Weisstein, “Archimedean Spiral,” “Logarithmic Spiral,” and “Fermat’s Spiral,” MathWorld. ↩
- H. Vogel, “A Better Way to Construct the Sunflower Head,” Mathematical Biosciences 44, nos. 3–4 (1979): 179–89. Vogel's model places the nth floret at θ = n × 137.5° and r = c√n, which is a Fermat spiral sampled at the golden angle. On the packing efficiency that results, see J. N. Ridley, “Packing Efficiency in Sunflower Heads,” Mathematical Biosciences 58, no. 1 (1982): 129–39. ↩
- The golden ratio φ has the continued fraction [1; 1, 1, 1, …], every term the smallest possible, which makes its rational approximations converge more slowly than those of any other irrational number; by Hurwitz's theorem it is the extremal case. G. H. Hardy and E. M. Wright, An Introduction to the Theory of Numbers, 6th ed. (Oxford: Oxford University Press, 2008), chap. 11. A contact pattern aligns with itself when its angular step is near a simple fraction of a turn, so the worst-approximable angle is the one that aligns latest. Paul asked for a spider web built on the Fibonacci numbers; the golden angle is where those numbers live in a spiral, so it is what is given here. ↩
- In a shallow shell, load is carried partly by bending and partly by stretching of the middle surface, and the stretching term dominates once the rise is large compared with the thickness, which is why a curved panel is far stiffer than a flat one of the same gauge. S. Timoshenko and S. Woinowsky-Krieger, Theory of Plates and Shells, 2nd ed. (New York: McGraw-Hill, 1959), chaps. 15–16. The application to a deliberately raised island is the author's. ↩
- Rolled sheet has different plastic properties along, across and at forty-five degrees to the rolling direction. The resulting planar anisotropy is what makes a drawn cup develop ears at four or six points around its rim. W. T. Lankford, S. C. Snyder, and J. A. Bauscher, “New Criteria for Predicting the Press Performance of Deep-Drawing Sheets,” Transactions of the American Society for Metals 42 (1950): 1197–1232; William F. Hosford and Robert M. Caddell, Metal Forming: Mechanics and Metallurgy, 4th ed. (Cambridge: Cambridge University Press, 2011), chap. 15. That a one-directional hand pattern imposes a comparable symmetry is the author's inference. ↩
- For a sheet of thickness t bent to radius R, the strain at the surface is approximately t/2R, zero at the mid-thickness and greatest at the two faces. R. H. Wagoner, J. F. Wang, and M. Li, “Springback,” in ASM Handbook, vol. 14B, Metalworking: Sheet Forming, ed. S. L. Semiatin (Materials Park, OH: ASM International, 2006), 733–55, eq. 3. See also chapter four, where the vocabulary for creases sets out why the paint, sitting at the surface, is the first thing to fail. ↩
- Incremental sheet forming deforms a panel with a small tool along a programmed path in many light passes, and achieves forming limits well beyond those of conventional stamping because the deformation remains localised and the strain is imposed in steps. J. Jeswiet, F. Micari, G. Hirt, A. Bramley, J. Duflou, and J. Allwood, “Asymmetric Single Point Incremental Forming of Sheet Metal,” CIRP Annals 54, no. 2 (2005): 88–114. The parallel with a hand pass is the author's, not the paper's. ↩
- Carl Friedrich Gauss, Disquisitiones Generales circa Superficies Curvas (Göttingen: Dieterich, 1828), art. 12, the theorema egregium: the Gaussian curvature of a surface is unchanged by any deformation that preserves distances measured within the surface. A plane has Gaussian curvature zero and a dish does not, so no bending alone carries one to the other. For a modern treatment see Manfredo P. do Carmo, Differential Geometry of Curves and Surfaces (Englewood Cliffs, NJ: Prentice-Hall, 1976), sec. 4-3. The application to repair order is the author's. ↩
- For a rounded indenter of radius R pressed with force F onto a flat surface, the Hertzian contact radius goes as (FR)^(1/3) and the mean contact pressure as F^(1/3)R^(−2/3); reducing the tip radius therefore raises the pressure delivered by a given force. K. L. Johnson, Contact Mechanics (Cambridge: Cambridge University Press, 1985), chap. 4. Halving R multiplies the mean pressure by 2^(2/3), about 1.59. The application to tip selection is the author's. ↩
- A thin sheet pushed out of plane at a point does not deform smoothly but forms a developable cone with a small core region in which the curvature is concentrated. E. Cerda and L. Mahadevan, “Conical Surfaces and Crescent Singularities in Crumpled Sheets,” Physical Review Letters 80, no. 11 (1998): 2358–61. ↩
- The elastic energy of a crumpled or creased sheet does not spread evenly but condenses into narrow ridges whose energy scales with a fractional power of their length, and into the vertices where those ridges terminate. A. E. Lobkovsky, S. Gentges, H. Li, D. Morse, and T. A. Witten, “Scaling Properties of Stretching Ridges in a Crumpled Elastic Sheet,” Science 270, no. 5241 (1995): 1482–85; see also T. A. Witten, “Stress Focusing in Elastic Sheets,” Reviews of Modern Physics 79, no. 2 (2007): 643–75. These describe elastic sheets; the extension to a plastically creased panel, and to the order of repair, is the author's. ↩